Copycat Bourbon Street Chicken

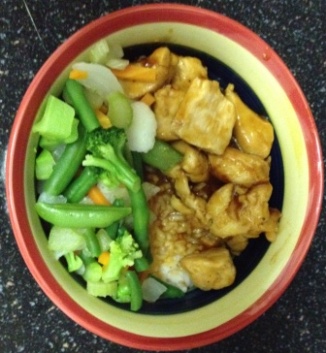
The bourbon street chicken has become a common dish in my house. At first I was a little afraid to make this because it seems to have a lot sugar in it with the brown sugar plus the sugar from the apple juice since I’m not a fan of overly sweet food as a main meal, but I was wrong. 

It’s easy to make and really inexpensive and I’ll tell you it’s really good! I bought a bottle of apple juice for the first time I cooked it and I’m still using the juice on the recipe like 2 months late and I still have almost half left! The main investment in the whole dish after you buy the original ingredients will be the chicken. I have modified the dish by adding steamed vegetables. I just buy a bag of frozen stir fry veggies and keep on hand and add to it. I’ve found it prevents me from eating a lot of rice. 

’til next time,

Crys

Ingredients:

  • 2 pounds bonless skinless chicken breast
  • 1 tablespoon olive oil
  • 1 garlic clove; crushed
  • 1/4 teaspoon ginger grated
  • 3/4 teaspoon crushed red pepper flakes
  • 1/4 cup apple juice
  • 1/3 cup light brown sugar
  • 2 tablespoons ketchup
  • 1 tablespoon cider vinegar
  • 1/2 cup water
  • 1/3 cup soy sauce
  • 1 tablespoon cornstarch; (if thick sauce desired)

Instructions:

Heat oil in a large skillet.

Add chicken pieces and cook until lightly browned.

Remove chicken.

Add remaining ingredients, heating over medium heat until well blended and dissolved.

Add chicken and bring to a hard boil.

Reduce heat and simmer for 20 minutes uncovered.

Serve over hot rice.
Image

BLT Bites

At our most recent potluck at work I decided to bring something a little different since it was more of a luncheon for co-workers that were getting married soon. The BLT bites I thought would make a simple easy to grab appetizer that would be easy to make.

I did a test run first because I’m not a fan of tomatoes and just wanted to see if it would be something I wanted to “put my name on” the test runs was a hit! Eric ate those things like they were candy. In the recipe below you’ll see that the major work is scooping out the inside of the cherry tomato. I found that it was easier to take the handle of a small spoon or another utensil and scoop out that way, you’ll also have an issue with the piece of flesh that runs down the center of the inside of the tomato so if you have small fingers you’ll need to get down and dirty inside there and pull it out. Depending on the size of party you’re attending the scooping out the insides can be time consuming so be aware of the time to prep plus chill.

Another tip I can suggest is if you have a food processor take your bacon and pulse it a few times in there so it will get fine, way easier than chopping. From experience the bacon is easier to work with in the recipe almost cooked to the point of being burnt (trust me it won’t mess with the flavor unless of course you do burn it 🙂 ).

I don’t have a photo of my own to share but I have posted one from the original site the photo is on. P.S. I got many compliments on the taste of these little beauties 🙂

’til next time,

Crys

Ingredients

  • 16 to 20 cherry tomatoes
  • 1 pound sliced bacon, cooked and crumbled
  • 1/2 cup mayonnaise
  • 1/3 cup chopped green onions
  • 3 tablespoons grated Parmesan cheese
  • 2 tablespoons snipped fresh parsley

Directions

  • Cut a thin slice off of each tomato top. Scoop out and discard pulp. Invert the tomatoes on a paper towel to drain.
  • In a small bowl, combine the remaining ingredients. Spoon into tomatoes. Refrigerate for several hours. Yield: 16-20 appetizer servings.

Nutritional Facts1 serving (1 each) equals 113 calories, 10 g fat (3 g saturated fat), 11 mg cholesterol, 206 mg sodium, 1 g carbohydrate, trace fiber, 3 g protein.

Image

Read More:  http://www.tasteofhome.com/Recipes/BLT-Bites#.T4eLgZFMG6q.pinterest

Simple Ice Cream – No ice cream maker required

Okay so for my first post I’m going to talk about my most recent venture. Yesterday I saw a recipe on Pinterest that claimed this was the best homemade ice cream that was super simple and only 3 ingredients. First, the ingredients are heavy cream, sweetened condensed milk and vanilla extract. I thought simple enough! And for the most part it is. I went to the store to grab the ingredients I thought for 3 ingredients this would be pretty inexpensive, I was kind of wrong. The 3 ingredients cost around $15 but then I decided that I should add a little something to the vanilla ice cream because I have a picky ice cream eater in the house so I got some reeses chips that cost around $4 so I’m roughly $20 in this ice cream making adventure and I get home to start making it.

Obviously, with only 3 ingredients it’s super simple to measure and pour out the ingredients in the mixing bowl and start mixing! I’m not sophisticated enough yet to get a fancy schmancy stand mixer so I got out my trusty old Betty Crocker hand mixer and got to mixing. The recipe says that it takes about 3-5 minutes to mix to firm hard peaks…WRONG. With my trusty old hand mixer I found myself going past 5 minutes, 8 minutes, 10 minutes, 15 minutes and FINALLY at 20 minutes I had the firm peaks forming. Once I was done with the forever mixing I added 1 cup reeses chips and then sprinkled a few on top and put in the freezer…in about 8 hours you will have easy ice cream….good luck at trying to wait and NOT test it…we failed miserably at this as we went in every few hours to “check” on it to see if it was forming properly LOL After this short adventure I will say today when I got home by George I had ice cream and it’s really tasty.

It’s a rich, thick  creamy ice cream that is NOT for the person that’s watching what they eat. Below is the recipe and personal photo. I’d suggest you can pretty much add anything to this recipe just as I did such as M&M’s, crushed candy bar, chocolate syrup, fruit, etc. Verdict is still out about whether or not the cost to make the ice cream is worth the effort when you can buy ice cream at the store for around 3 or 4 dollars depending on the brand.

Ingredients

  • 2 cup(s) heavy cream
  • 1 can(s) (14-ounce) sweetened condensed milk
  • 1.5 teaspoon(s) pure vanilla extract

Directions

  1. Using an electric mixer on high speed, beat the heavy cream, condensed milk, and vanilla in a large bowl until thick, stiff peaks form, 3 to 5 minutes.
  2. Transfer the mixture to a loaf pan or freezer-safe container, cover and freeze until firm, at least 8 hours and up to 2 weeks.

Nutritional Information
(per serving) makes 12 servings

Calories 246
Total Fat 18g
Saturated Fat 11g
Cholesterol 66mg
Sodium 57mg
Total Carbohydrate 19g
Dietary Fiber 0
Sugars
Protein 3g
Calcium

Read more: http://www.womansday.com/recipefinder/vanilla-ice-cream-recipe-wdy0812

Hello world!

Hello! After getting many questions about the recipes I try and requests for ideas of meals to cook I’ve decided it’s about time that I start a blog that highlights recipes and gives my spins and thoughts on them. I am by no means a chef and don’t claim to cook but I can follow a recipe and add/take away when necessary 🙂 I claim no ownership of the recipes unless noted and hope that I can help with the overwhelming feeling you may get when you log on to sites such as Pinterest, Food.com, Allrecipes.com, etc. by providing recipes that the everyday person might enjoy and can AFFORD! Please feel free to ask, request and share your thoughts/opinions as well!!