Zucchini Parmesan Side Dish

I haven’t posted in a while because I haven’t made anything super interesting due to preparing for and then going camping. Now that we have come back from an amazing vacation in Yosemite it’s time to start getting serious again and getting back on track with eating healthy.

Tonight I was still in vacation mode (didn’t even cook anything last night!) so I decided to keep it simple and tried this side dish with some chicken I rubbed a southwestern seasoning on I had left over from another dish I tried a while back. This meal was so easy but was very tasty and satisfying. 

I added some spices to my dish that weren’t in the original recipe to add some additional flavor to the dish. I added 1 teaspoon of minced onions and 1/4 teaspoon cayenne pepper. Also this recipe makes a ton so if you have a big family cut it in half there is more than enough and since I originally bought enough for the full recipe I’ll be making it again next week 🙂 Enjoy!

’til next time,

Crys


6 ServingsPrep/Total Time: 25 min.

Ingredients

  • 1/2 to 1 teaspoon minced garlic
  • 1 tablespoon olive oil
  • 4 medium zucchini, cut into 1/4-inch slices
  • 1 can (14-1/2 ounces) Italian diced tomatoes, undrained
  • 1 teaspoon seasoned salt
  • 1/4 teaspoon pepper
  • 1/4 cup grated Parmesan cheese

Directions

  • In a large skillet, saute garlic in oil. Add zucchini; cook and stir
  • for 4-5 minutes or until crisp-tender.
  • Stir in the tomatoes, seasoned salt and pepper. Simmer, uncovered,
  • for 9-10 minutes or until liquid is absorbed and mixture is heated
  • through. Sprinkle with Parmesan cheese. Serve with a slotted spoon.
  • Yield: 6 servings.
Nutrition Facts: 1/2 cup equals 81 calories, 3 g fat (1 g saturated fat), 3 mg cholesterol, 581 mg sodium, 10 g carbohydrate, 2 g fiber, 3 g protein.Diabetic Exchanges: 2 vegetable, 1/2 fat.

 Read More: http://www.tasteofhome.com/Recipes/Zucchini-Parmesan/Print

Lemon Butter Chicken & Spiced Pinto Beans

Tonight I was going to make a really good looking dish that I found on Pinterest that was Blackened chicken and Cilantro Lime Quinoa…now I’ve never had quinoa so I decided I wanted to try and after researching recipes I really wanted to try this because the yogurt sauce on top looked really good. I go to the store get all my ingredients in the “ingredient list” and come home to make it. Then after going through the recipe before I start at the very end the yogurt sauce indicated it had avocado but the avocado wasn’t in the ingredient list AGHKKKK lesson learned I should read the entire recipe BEFORE I plan on making the dish even before going to the store but really?! come on! If you’re going to blog (got this from another blogger) about a recipe and give the steps at least proof read before you post something…I’m not talking about typos or grammar but a key ingredient in a recipe!! Off the soap box now to my “dinner save”.

I had these chicken breasts thawed and the only thing that I had completely thawed so I needed to make something with them after thinking about it I decided I’d pan fry them and then put some lemon/butter sauce over the top of them. This recipe is really easy and I actually made it up on my own! Your mouth and tummy will be really happy at this easy and inexpensive dish! 

The next part of my “thrown together” meal was a recipe I found online for spiced pinto beans. I’m not exactly sure why I had pinto beans in the cabinet since we don’t usually eat canned foods since I try to stay fresh or frozen but whatever I had them so I googled recipes to use them as a side dish…this again is a really easy inexpensive dish that will leave your tummy happy and taste buds excited! I altered a little by not “mashing” the beans I just left them as they were. I forgot the cilantro until the last minute so I just garnished it with it once I got it on the plate. The cumin really makes this dish so if you’re not a fan of cumin I don’t suggest “trying this at home”. 

One thing I want to mention in this post is the use of chicken broth…before I always bought canned or boxed broth but one day I decided that I’d try the cubes and I was immediately hooked to using that over canned because first it’s cheaper, second I have it on hand at all times instead of running out like I tended to do with canned/boxed broth and three I can control the flavoring of the broth (strong or subtle) I’ve graduated to granules over the cubes because it’s even cheaper than the cubes AND I can get a HUGE bottle of it at Costco and I’ll never run out LOL If you currently use canned I suggest you try the granules/cubes. Yes it seems like “extra work” but seriously to save a few bucks and to not run out of it boiling some water and dropping a cube/tablespoon of it in the water is not that hard so don’t be lazy!!!

’til next time,

Crys

Lemon Butter Chicken:

Ingredients:

Canola Oil

2 chicken breast pounded out if thick

flour

1.5 teaspoon lemon juice

1 teaspoon butter

1/4 chicken broth

salt

pepper

Instructions:

1. Lightly flour chicken and season with salt and pepper to your taste

2. Heat about a tablespoon of canola oil (you can use vegetable but canola is what I had on hand) in pan on medium-high heat

3. place chicken in pan and cook for about 7 minutes on each side

4. Remove chicken from pan when each side has a dark brown crust

5. Put lemon juice, broth & butter in pan until butter is melted

6. place chicken back in pan and coat both sides with lemon butter mixture

7. ENJOY!

Spiced Pinto Beans:

Ingredients
1/2 small onion, chopped (I altered the amount here from original because even though I had a tiny onion it was just too much to use the whole one and I like onion!)
1 small clove garlic, minced
1/2 jalapeno, minced
1/2 teaspoon chili powder (I didn’t even realize this was in the recipe until I was proof reading it just now LOL If you don’t have it or don’t like it I don’t think you’ll care that it’s omitted)
2 teaspoons canola oil
1 cup canned pinto beans, rinsed
2 tablespoons broth, or water
1/4 teaspoon cumin
1/4 teaspoon salt
1 tablespoon chopped fresh cilantro
Preparation
1. Saute onion, garlic, jalapeno and chili powder in oil in a small saucepan until softened. Add beans, broth (or
water), cumin and salt. Coarsely mash half of the beans in the pot and simmer until heated through. Stir in
cilantro.
Nutrition
Per serving : 167 Calories; 6 g Fat; 1 g Sat; 3 g Mono; 0 mg Cholesterol; 23 g Carbohydrates; 7 g Protein; 7 g Fiber; 414
mg Sodium; 371 mg Potassium

Read More: http://www.eatingwell.com/recipes/spiced_pinto_beans.html

Weight Watchers Cheesy Jalapeno Popper Stuffed Chicken

I’m currently sitting here rubbing my belly with complete satisfaction….I wasn’t looking specifically for a weight watchers recipes but I saw this on pinterest and just the title peaked my interest. I’m SO glad I decided to try this recipe because it was for sure satisfying and healthy. I decided to pair this dish with sauteed zucchini and peas and corn. The zucchini was kind of an after thought so I just tossed it in a pan with olive oil and then salt, pepper and garlic powder. YUM

I didn’t really do anything to alter this recipe but I wasn’t as consistent as someone that would be doing weight watchers might be so pay attention! I pounded my chicken breasts because mine were bigger than 4 oz so be sure to do that if your’s are bigger too. Enjoy!

’til next time,

Crys

My pictures really does this no justice please take a look at the picture on the recipe to really get an idea, I just wanted to share what mine looked like.

Read More: http://www.skinnytaste.com/2012/04/cheesy-jalapeno-popper-baked-stuffed.html

Creamy Cajun Chicken Pasta

I had some heavy cream left over from my attempt at making the ice cream a few posts ago and since the cream is not cheap I couldn’t go and allow it to spoil and waste away so initially I went on a search to see if  I could freeze it just like I had with my left over buttermilk and while it does say freezing the heavy cream is okay it indicated it wouldn’t whip up very good like it would if fresh and unfrozen soooo I asked my friend Google to give me recipes that use heavy cream and one of the things I found I had most of the ingredients in my kitchen for was this Creamy Cajun Chicken Pasta recipe. I thought perfect!

Now there are a few things that I altered in this recipe because I didn’t have the exact ingredients like sun dried tomatoes. I had a can of diced tomatoes that I used in place of these and while the sun dried tomatoes would have been delicious I figured there was no reason in wasting money buying them if I already had the diced tomatoes and they’re not a major component in the recipes. The next thing is I had bought some shredded parmesan cheese for some reason and after buying I couldn’t figure out why so instead of using grated parm cheese I used the shredded I had and sometimes I’ve noticed if you use grated over shredded or vise versa in a recipe it doesn’t really change the flavor but sometimes can change the texture of a dish but in this case I don’t think it was a bad thing to use shredded over grated. The only other thing I can add is the recipe says 1-2 cups of heavy cream I used a cup and a half and it was almost too much so start with 1 cup and see where you’re at and then you can always add more if you think you need more but I really think 1 cup is more than enough. Enjoy!

’til next time,

Crys


Ingredients

    • 2 boneless skinless chicken breasts, cut into thin strips
    • 4 ounces linguine, cooked al dente
    • 2 teaspoons cajun seasoning ( your recipe, recipe #14190 or store-bought)
    • 2 tablespoons butter
    • 1 thinly sliced green onions
    • 1 -2 cup heavy whipping cream
    • 2 tablespoons chopped sun-dried tomatoes
    • 1/4 teaspoon salt
    • 1/4 teaspoon dried basil
    • 1/8 teaspoon ground black pepper
    • 1/8 teaspoon garlic powder
    • 1/4 cup grated parmesan cheese

Directions

  1. Place chicken and Cajun seasoning in a bowl and toss to coat.
  2. In a large skillet over medium heat, sauté chicken in butter or margarine until chicken is tender, about 5 to 7 minutes.
  3. Reduce heat add green onion, heavy cream, tomatoes, basil, salt, garlic powder, black pepper and heat through.
  4. Pour over hot linguine and toss with Parmesan cheese.


Read More: http://www.food.com/recipe/creamy-cajun-chicken-pasta-39087


Teriyaki Chicken with Bok Choy

So I’ve been on a mission to try things lately that I’ve never had and Bok Choy wasn’t even on my radar until I was looking online for recipes to make with my surplus of chicken thighs I have in the freezer. Eric had never had Bok Choy before himself so neither of us had any idea how it would taste. Bok Choy virgins! So I set out to make this recipe with not a lot of expectation but it will be something I save the recipe and make again!!

I have to say while cooking the chicken I was really concerned with it burning because it was cooking at such a high oven temperature so I kept checking it every few minutes and my anxiety grew as I’d check it and the chicken appeared black like you’ll see in the photo but let me tell you now there is nothing to worry about it’s intended to be this color. When you go to town eating this dish you will savor that extra crispy teriyaki flavored skin. 

There isn’t much guidance on how to prepare the bok choy and if you’ve never made it or had it you can be a little lost when making this dish but from my experience the leaves that I basted with the teriyaki sauce were moist and yummy and the ones that may had not gotten any teriyaki sauce on them tended to crisp up and almost burn so I’d say baste the bok choy with the teriyaki sauce and also rinse the bok choy before cooking because the moisture from the water will also help it. Enjoy!

’til next time,

Crys

Serves 4

Hands-On Time: 10m

Total Time: 1hr 05m

Ingredients

  • 1  clove garlic, chopped
  • 1/4  cup  plus 1/3 cup teriyaki sauce
  • 8  bone-in chicken thighs (2 1/2 pounds)
  • 1  cup  long-grain white rice
  • 2  bunches  baby bok choy, quartered

Directions

1. In a large bowl, combine the garlic and ¼ cup of the teriyaki sauce. Add the chicken, turn to coat, cover, and let marinate for 30 minutes.

2. Cook the rice according to the package directions.

3. Meanwhile, heat oven to 450° F. Place the chicken on a foil-lined rimmed baking sheet and roast, basting with the remaining ⅓ cup of teriyaki sauce, until cooked through, 25 to 30 minutes. Ten minutes before the chicken is done, add the bok choy. Serve the chicken and bok choy over the rice.

Tip

To make your own teriyaki sauce, whisk together ½ cup soy sauce, ½ cup water, ¼ cup packed light brown sugar, 1 clove garlic (chopped), and ½ teaspoon of ground ginger.

Nutritional Information

Calories 594; Fat 24g; Sat Fat 7g; Cholesterol 140mg; Sodium 1,210mg; Protein 45g; Carbohydrate 47g; Sugar 5g; Fiber 2g; Iron 4mg; Calcium 40mg


Read More: http://www.realsimple.com/food-recipes/browse-all-recipes/teriyaki-chicken-bok-choy-00100000078547/

Spice Storage for Camping or Tailgating

We are going on our long awaited camping trip to Yosemite at the end of this month!! I can’t wait! My living room has turned into a storage area for all things camping and I’m in charge of the “kitchen” so I’ve been going back and forth on exactly how I was going to store spices and other food items since we will be in bear country. I don’t care what you say just because there’s a bear box to store things in they will still smell it and try to get in that box!

I decided I’d try the pill holder trick where you take one of those daily pill holders and put some spices that I will need some of but not so much. I’m really undecided on how effective this is. First, it’s not tight enough to hold in the smell of the spices so the bear issue is out the door for spices if they want to smell it they will…Secondly I put a little salt to have on hand just in case something happens to my salt shaker I’m taking and it seems to be too fine for the pill holder because if you move it the salt will come out of the side. Now obviously the pill holder isn’t made for this type of use but the people that have suggested it all over online failed to mention this little piece of information. I’m pretty certain by the time we get to Yosemite the salt will be in the bottom of the ziploc bag I put the pill holder in lol

So….while the concept is great execution is not so great. You would probably be better off buying the spice bottle that has partioned off spices in one container that they sell in most camping sections at stores or trying the tic tac container trick which I have never tried so don’t really know if it will work either. 

’til next time,

Crys


Homemade Taco Seasoning

I’ve been trying to be considerate of salt intake lately after seeing someone that shall go unnamed put a crazy amount of salt on “HIS” food and I swear if you look at the labels of things you buy out of convenience you would be speechless at the amount of sodium really is in things. A friend and I were at a grocery store after a workout and she pointed out to me that even the frozen vegetables have added sodium..I was like “WHAT??” I seriously just thought they were frozen at peak freshness to preserve, I never considered that sodium would be added!!

Anyway, I have found in my opinion a no brainer recipe that really is easy to put together and store for taco seasoning and in my opinion has a better flavor and the best part is you can control how much or little of something you can put in it.

I have grown fond of going to certain stores like Food 4 Less or Superior in my neighborhood that caters to the latin population and has a ton of spices they use in their food that are sold in bulk. I’m going to be honest I was really pissed when I walked in and saw I could get a bag of chili powder for .79 cents but when I go to any other grocery store  I’m paying $3 and $4 for a small bottle!!!  So in the long run not only for your spice collection but also for the numerous packets you have to purchase of the pre-made stuff this is more cost effective. So if you have access to spice in bulk I’d suggest go with that option when making something like this since it makes a fairly large batch at once. The recipe below will snugly fit in an 8 oz mason jar as an FYI of the size container you will need. If you don’t have a container a ziplock bag will work as well. Enjoy!

’til next time,

Crys


Taco Seasoning:

 1/2 cup chili powder
1/4 cup onion powder
1/8 cup ground cumin
1 tablespoon garlic powder
1 tablespoon paprika
1 tablespoon sea salt
*I added 1 teaspoon of cayenne for some kick* 

Crockpot Chicken and Sausage Gumbo

A while back my company put together a company wide potluck that was themed “cultural” so we were to bring dishes that we would make in our culture and share these recipes for a cookbook they were putting together that we could purchase to donate the funds to the wounded warriors project. Out of all the many many (and I do mean many) potlucks we have this has to be the best idea! What better way to have an excuse to get together and share our favorite food AND also raise money for an awesome cause? I knew immediately what I wanted to bring and that was Gumbo. This is a dish that I grew up with my dad making (he has a cajun lineage) and one I enjoy making on chilly/rainy days.

The problem that I’ve had in the past is gumbo is really good if not better as a left over because the flavors have had a chance to really really marry but being cooked in a crockpot has never really worked with this dish when I’ve attempted. In my experience of all dishes made in a crockpot after a while the meat (whatever it may be) tends to start to breakdown and become mushy even if you put it on a low setting (mine has an 8 & 10 hour low setting). I set out to find a recipe for gumbo that was specifically designed for the crockpot and came across this one on about.com.

I don’t know if you’ve ever gone through about.com but it is in my opinion of the most underrated sites out there. I swear I find anything I’m looking for there when I’m on a mission to find a specific recipe so next time you’re lookin around for something think about checking about.com out if you don’t already. 

A few things with this recipe in specific:

1. Don’t get impatient with the roux (like I tend to do) let it keep going and get a deep deep dark brown because it will definitely benefit the flavor factor if you have patience. I tend to see it start to turn brown and go “yep it’s done” and kick myself after the fact because if I would have let it go for a few more minutes the flavor would have been so much more rich.

2. When you’re using frozen okra it tends to breakdown a lot faster whether it’s in the crock pot or just a regular gumbo recipe so I know the recipe says to put it in with the rest of the ingredients and cook for 7 to 9 hours but PLEASE wait until the very end. I would say 45 minutes before serving is more than enough time to get it to thaw and that’s really your goal since it’s already cooked. If you are taking it to a potluck or party and have a warm setting and the crockpot will be on for a few hours then tossing it in before leaving the house will be sufficient. The same goes for the shrimp put it in at the same time you do the okra. Nothing worse than chewy overcooked shrimp! 

3. For some reason the recipe fails to use bay leaves so if you have some in the cabinet definitely use in this can’t go wrong with a cajun dish and adding bay leaf even if the recipe doesn’t call for it! Also if you like spicy food some cayenne to your taste is necessary. 

4. If you have chicken bullion please use it when cooking the rice (this goes anytime you cook the rice) you have no idea how much more flavor your rice will have if you don’t already do this. I have a jar of chicken bullion on hand at all times and when I’m cooking rice I just toss a teaspoon in the boiling water, you can also use canned broth but I’ve found investing in a jar of bullion is the least expensive option.

That’s all I have for now. Enjoy!

’til next time,

Crys

Unfortunately another dish I deleted the photo of before I started the blog 😦

Cook Time: 7 hours

Total Time: 7 hours

Ingredients:

  • 3 tablespoons all-purpose flour
  • 3 tablespoons oil
  • 1/2 pound smoked sausage, cut into 1/2 inch slices
  • 3/4 to 1 pound boneless chicken thighs, cut in bite-size pieces
  • 1 1/2 to 2 cups frozen cut okra
  • 1 cup chopped onion
  • 1/2 cup chopped green bell pepper
  • 3 cloves garlic, minced
  • 1/4 teaspoon ground cayenne pepper, or to taste
  • 1/4 teaspoon ground black pepper
  • 1 can (14.5 ounces) diced tomatoes, undrained
  • 1 cup frozen medium shrimp, cleaned and cooked
  • 1 1/2 cups uncooked regular long-grain white rice
  • 3 cups chicken broth or water (updated 9/07)

Preparation:

In small saucepan, combine flour and oil; mix well. Cook, stirring constantly, over medium-high heat for 5 minutes. Reduce heat to medium-low; cook, stirring constantly, about 8 to 12 minutes or until mixture turns a light red-brown. Place flour and oil mixture in 3 1/2 to 4-quart crockpot. Stir in all remaining ingredients except shrimp, rice, and broth or water. Cover and cook on LOW for 7 to 9 hours. Add cooked shrimp to the gumbo; mix well. Cover and continue to cook on LOW for 20 minutes longer. Meanwhile, cook rice in the broth or water according to package directions. Serve gumbo over the hot cooked rice.

Southwestern Chicken Salad

I have to be the worst salad eater in existence. Give me some iceberg lettuce, cheese and salad dressing and I am happy.  Eric on the other hand loves a big hearty salad and can’t stand iceberg lettuce, he prefers romaine…so we fight about salads alllll the time. One day he suggested I look around for a salad to have as a meal that I would like to try and make it for dinner. I found this recipe for southewestern chicken salad and I can’t remember exactly what I was thinking at the time I was looking at it but I must have been hungry because no way in the world would I have chosen this in the right frame of mind. Whatever the reason I was glad I did try it because it opened my eyes to putting things on my salad that I would never in a million years would have tried like corn, black beans or jicama.  The dressing as simple as it is really is a good dressing that I can see being eaten on other salads as well. I didn’t change too much on this recipe but I’m sure if you use your imagination could alter it in anyway and it would still be delish. 

I have saved this site in http://www.pepperplate.com (see previous post about this AMAZING site) but when I click on the link that takes you to the full recipe on allrecipes and the recipe is not the same. So just note that this is not something I created, it was found from allrecipes but it looks like they drastically altered the recipe there. Thankfully pepperplate still has the original recipe I’ve tried and put my “stamp of approval” on. Enjoy!

’til next time,

Crys

This photo is from the original recipe. Unfortunately I deleted the photo I took of mine before I realized I wanted to start this blog.

INGREDIENTS

    • 2 (6 inch) flour tortillas, cut into 1/2 inch strips
    • Butter-flavored nonstick cooking spray
    • 1 pound boneless skinless chicken breasts, cut into 1-inch cubes
    • 1 teaspoon olive oil
    • 6 cups ready-to-serve salad greens
    • 1 (15.25 ounce) can whole kernel corn, drained
    • 1 (15 ounce) can black beans, rinsed and drained
    • 2 cups chopped tomatoes, divided
    • 1 medium green pepper, diced
    • 1/2 cup cubed peeled jicama or sliced water chestnuts
    • 1/3 cup chopped green onions
    • 1/2 cup shredded reduced-fat Cheddar cheese
    • 2/3 cup fat-free ranch salad dressing
    • 4 teaspoons barbecue sauce

INSTRUCTIONS

    1. Place tortilla strips on a baking sheet; spritz both sides of strips with butter-flavored cooking spray. Bake at 350 degrees F for 4-5 minutes or until crisp. Meanwhile, in a large nonstick skillet, cook chicken in oil over medium heat until no longer pink; set aside.
    2. Combine the salad greens, corn, beans, 1 cup tomatoes, green pepper, jicama and onions; arrange on a serving platter. Place chicken in center of salad; sprinkle with cheese and remaining tomatoes. Arrange tortilla strips around chicken. In a small bowl, combine the ranch dressing and barbecue sauce; serve with salad.

Awesome Pasta Salad

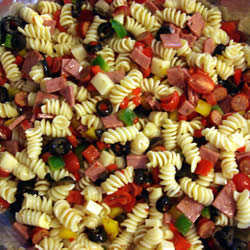
This pasta salad is good to take to a backyard bbq, potluck or just to have for the family at home on a summer day. I’m not a fan of tomatoes and Eric doesn’t usually miss them when I omit them from a recipe but this one I decided to stick with the tomatoes and was pleasantly surprised. When you add all the cheese and Italian dressing the tomatoes aren’t such an overwhelming flavor like they usually are to me. I made a batch of this and it lasted forever with just the two of us, we were eating this at lunch, dinner and just for a snack to eat it before it went bad so be prepared to eat when you make this if you have a small group or family!

’til next time,

Crys

Ingredients

  • 1 (16 ounce) package fusilli (spiral) pasta
  • 3 cups cherry tomatoes, halved
  • 1/2 pound provolone cheese, cubed
  • 1/2 pound salami, cubed
  • 1/4 pound sliced pepperoni, cut in half
  • 1 large green bell pepper, cut into 1 inch pieces
  • 1 (10 ounce) can black olives, drained
  • 1 (4 ounce) jar pimentos, drained
  • 1 (8 ounce) bottle Italian salad dressing

Directions

  1. Bring a large pot of lightly salted water to a boil. Add pasta, and cook for 8 to 10 minutes or until al dente. Drain, and rinse with cold water.
  2. In a large bowl, combine pasta with tomatoes, cheese, salami, pepperoni, green pepper, olives, and pimentos. Pour in salad dressing, and toss to coat.

Nutritional Information open nutritional information makes 16 servings

Amount Per Serving  Calories: 310 | Total Fat: 17.7g | Cholesterol: 31mg

this is not my photo, but it shows exactly how the recipe looks when all put together